Codice produttore PIM551
PICO RGB KEYPAD BASE
Pimoroni Ltd
License: See Original Project Raspberry Pi MCU
For as long as I have worked in CAD programs, I’ve always thought it would be nice to have a space mouse to control certain aspects of the software. If you aren’t familiar, a space mouse is a specialty mouse used to rotate or control a 3D object in a CAD Program. While looking into some of the DIY space mouse builds out there, I noticed that a lot of them are just using Adafruit’s HID library to control some of the CAD commands, and it got me thinking of a project. Could I build a CAD Keypad?
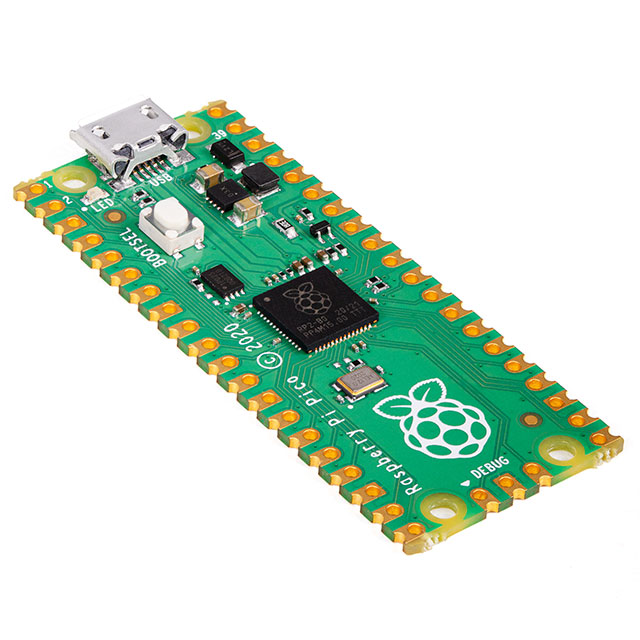
I was looking through the various products I had collected that were not in use yet and realized I had one of Pimoroni’s Pico RGB keypads (DK part number 1778-PIM551-ND). The Pimoroni Pico RGB keypad uses a Raspberry Pi Pico for the microcontroller, one of the most readily available microcontrollers. So, this would be a perfect project to learn more about the Pico and the Pico RGB keypad.
With OnShape being my most frequently used CAD software, I started researching what keyboard shortcuts exist for it. During my research, I discovered over 100 keyboard shortcuts that can be used with this software. There are so many shortcuts that they have them divided into different sections depending on what part of the program you are in. There is a general section, assembly section, part studio section, 3D view section, sketch section, and a drawings section.
To test if my idea would work, I wanted to see if I could get the rotation of the object to work first. In order to get that to work, I would need to be able to send the 4 keyboard directional button commands to the software. After looking at the keypad, I decided to assign the button labeled 1 as the up arrow, 4 as the left arrow, 6 as the right arrow, and 9 as the down arrow.
The next thing that I had to decide was whether I wanted to program these with either the Arduino IDE or CircuitPython. Since I had rarely used CircuitPython, I thought this might be a good learning experience to program with it.
I started by downloading the latest version of CircuitPython for the Keybow 2040 as directed by Pimoroni in this getting started guide, https://github.com/pimoroni/pmk-circuitpython. Once that was completed my Pico RGB Keypad was showing up as a CircuitPython device on the computer, so I knew I was ready to start programming it. I had previously used Thonny as the IDE for programming so that was already installed on my computer.
I then began to research what libraries were needed to get this up and running. While looking through various projects other people had created, I noticed that there are a few commonly used libraries. They are time, board, busio, and usb_hid. To get the LEDs on the board to work, I also had to add the Adafruit_dotstar library. Lastly, to add the capability for the device to emulate keyboard functions, I Imported 3 libraries, Adafruit_hid.keyboard, Adafruit_hid.keyboard_layout_us, and Adafruit_hid.keycode.
import time
import board
import busio
import usb_hid

from adafruit_bus_device.i2c_device import I2CDevice
import adafruit_dotstar

from adafruit_hid.keyboard import Keyboard
from adafruit_hid.keyboard_layout_us import KeyboardLayoutUS
from adafruit_hid.keycode import Keycode
From there I dug into the code in Adafruit’s Keycode library, https://docs.circuitpython.org/projects/hid/en/latest/, to determine which codes were used to call out the directional buttons. The commands were fairly straightforward as the up and down directional arrows were called out by sending a keyboard command of Keycode.UP_ARROW and Keycode.DOWN_ARROW and left and right were Keycode.LEFT_ARROW and Keycode.RIGHT_ARROW. I opened Thonny and started putting together the program.
After modifying the code, I had found from a couple of different sources, I ended up with the following code.
import time
import board
import busio
import usb_hid
from adafruit_bus_device.i2c_device import I2CDevice
import adafruit_dotstar
from adafruit_hid.keyboard import Keyboard
from adafruit_hid.keyboard_layout_us import KeyboardLayoutUS
from adafruit_hid.keycode import Keycode
from adafruit_hid.consumer_control import ConsumerControl
from adafruit_hid.consumer_control_code import ConsumerControlCode
from digitalio import DigitalInOut, Direction, Pull
cs = DigitalInOut(board.GP17)
cs.direction = Direction.OUTPUT
cs.value = 0
num_pixels = 16
pixels = adafruit_dotstar.DotStar(board.GP18, board.GP19, num_pixels, brightness=0.1, auto_write=True)
i2c = busio.I2C(board.GP5, board.GP4)
device = I2CDevice(i2c, 0x20)
kbd = Keyboard(usb_hid.devices)
layout = KeyboardLayoutUS(kbd)
def read_button_states(x, y):
pressed = [0] * 16
with device:
device.write(bytes([0x0]))
result = bytearray(2)
device.readinto(result)
b = result[0] | result[1] << 8
for i in range(x, y):
if not (1 << i) & b:
pressed[i] = 1
else:
pressed[i] = 0
return pressed
held = [0] * 16
while True:
pressed = read_button_states(0, 16)
if pressed[1]: #check to see if button 1 is pressed
if not held[1]:#check to make sure the held variable isn't true
print("Up Arrow") #print action to serial monitor
kbd.send(Keycode.UP_ARROW)#send the keyboard command Up arrow to the device
held[1] = 1
elif pressed[4]: #check to see if button 4 is pressed
if not held[4]: #check to make sure the held variable isn't true
print("Left Arrow") #print action to serial monitor
kbd.send(Keycode.LEFT_ARROW)#send the keyboard command Left Arrrow to the device
held[4] = 1
elif pressed[6]: #check to see if button 6 is pressed
if not held[6]: #check to make sure the held variable isn't true
print("Right Arrow") #print action to serial monitor
kbd.send(Keycode.RIGHT_ARROW)#send the keyboard command Right Arrrow to the device
held[6] = 1
elif pressed[9]: #check to see if button 9 is pressed
if not held[9]:#check to make sure the held variable isn't true
print("Down Arrow") #print action to serial monitor
kbd.send(Keycode.DOWN_ARROW)#send the keyboard command Down Arrow to the device
held[9] = 1
else: # Released state
for i in range(16):
held[i] = 0 # Set held states to off
time.sleep(0.1) # DebounceIt was time to test to see if this would work as anticipated.
For the initial test, I pressed the “Run Current Script” button in Thonny and started pressing the assigned keypad buttons. I was getting the printouts of each of the directional keys in the Serial monitor, and it was also moving my cursor around in the code. Next up was to open an instance of OnShape and test it in that environment. Once the software was open and one of my drawings active, I tried out the keypad by pushing the 4 buttons. It was rotating the object. It was working! The one thing that I did notice was that it was only rotating 15 degrees at a time, and it wouldn’t rotate further unless I released and pressed the button again.
Based on the initial test, I decided the next three things I would tackle would be adding color to the 4 buttons to keep track of which ones I was using, getting the continuous rotation working, and adding an option so I could pan the object around the screen instead of rotating.
Adding the color to the 4 buttons was fairly easy. To standardize the color, I wanted to create a variable (green) and assign it the RGB color code of 0,255,0. One thing I found out after searching the web to find out more about variables is that when declaring a variable, it does not need to be called out as a certain type of variable. Once the initial value is assigned, it is automatically classified behind the scenes. This makes creating variables simple. After creating the variable and assigning the values, I assigned them to the pixels for the four buttons that we were using - 1, 4, 6, and 9.
The variable I created looked like this.
green = (0,255,0)
Under the while true statement, I also added these lines to get the pixels to light:
#Color coding the buttons according to thier function pixels[1] = green pixels[4] = green pixels[6] = green pixels[9] = green
I tested this by saving the code which automatically updates it on the board. The 4 buttons were now lit in green.
if pressed[1]: #check to see if button 1 is pressed
if not held[1]:#check to make sure the held variable isn't true
print("Up Arrow") #print action to serial monitor
kbd.send(Keycode.UP_ARROW)#send the keyboard command Up arrow to the device
held[1] = 1
elif pressed[4]: #check to see if button 4 is pressed
if not held[4]: #check to make sure the held variable isn't true
print("Left Arrow") #print action to serial monitor
kbd.send(Keycode.LEFT_ARROW)#send the keyboard command Left Arrrow to the device
held[4] = 1Next up was to try getting a constant rotation while the button was held. Looking deeper into the code (shown above), I noticed after the “if or elif pressed” statements, there was an "If not held” statement. Also, at the end of that statement, there was a variable called “held” that was being changed to a “1”. My first thought was to comment out both the “if not held” statement, as well as the “held” variable assignment for each of the buttons. Here is an example of what the code looked like for each button.
if pressed[1]: #check to see if button 1 is pressed
# if not held[1]:#check to make sure the held variable isn't true
print("Up Arrow") #print action to serial monitor
kbd.send(Keycode.UP_ARROW)#send the keyboard command Up arrow to the device
# held[1] = 1I then saved the code and opened OnShape to see if this would work. I switched my screen to OnShape, pressed the right directional button, and held it down. My drawing rotated continuously. However, it was too fast to accurately control where I wanted the object to stop. I thought for a few moments and began to wonder, what would happen if I added a slight delay to the code. Will that slow it down at all? I entered a sleep command of 0.1 seconds or 100 milliseconds. I saved the code and uploaded it again.
if pressed[1]: #check to see if button 1 is pressed
# if not held[1]:#check to make sure the held variable isn't true
if pan != 1:
print("Up Arrow") #print action to serial monitor
kbd.send(Keycode.UP_ARROW)#send the keyboard command Up arrow to the device
time.sleep(0.1)
# held[1] = 1This time the part was continuously rotating but at a much more manageable speed.
The next step that I was looking to add was a Pan function for the controls. I knew I wanted to toggle this on and off without holding down a button. My first thought was to set up a variable. I called it "pan" to be able to change back and forth between a 0 and 1 or true and false. Next, I decided to add a color to the button that would change depending on if the pan variable was true or not. I decided that I would set the pixel to a light red color if the pan variable was false and to orange if the pan variable was true. I then added code to change the variable to the opposite condition when pushed, essentially setting it up similarly to a switch. Next, I went into each of the code sections for the 4 directional buttons and updated the code. So, there were two conditions used, one for when the pan variable is false and one for when it is true. The current code I had up to this point was put under the “if pan does not equal 1” set of code. Under the “if pan does equal 1” set I updated the keyboard send command to include 3 commands, Keycode.CONTROL, Keycode.SHIFT, and the command for the directional arrow I was using such as Keycode.UP_ARROW. This would cause the object that I am looking at in OnShape to pan in whichever direction I’m pressing instead of rotating. Here is an example of that code.
elif pressed[5]: #check to see if button 5 is pressed
if not held[5]:#check to make sure the held variable isn't true
if pan != 1: # check to see if the pan variable is not equal to 1
pixels[5] = light_red #set the pixel to light red
pan = 1 #set the pan variable to 1
print("Control Shift ON") #print action to serial monitor
held[5] = 1 #change the held variable for this button to true
elif pan == 1: # if the pan variable is equal to 1
pixels[5] = orange #set the pixel to orange
pan = 0 #set the pan variable to 0
print("Control Shift OFF") #print action to serial monitor
held[5] = 1 #change the held variable for this button to trueNext, I saved the code and went back to OnShape. I pressed button 5 and noticed the color on the key had changed. I then pressed the up button, and the object panned upwards. I then tried panning down while holding the button. It did pan downwards continuously however, there was a slight delay after every step. To correct this, I tried commenting out the delay that I had added for the rotation commands. After updating the code, I saved it and went back to OnShape again. This time when I activated the pan button and held a directional button the object panned perfectly with no delay and not overly fast.
Perfect!!
The commands to this point were all working out well so, I thought the next thing I could add was zoom functionality.
Looking through the keyboard shortcuts available, I noticed that there were 4 options that I thought would be good to include, Zoom in, Zoom out, Zoom to fit, and Zoom to Window. Next, I decided that the next 4 buttons I would use were the ones labeled 0, 2, 8, and A. I decided to use button 0 as Zoom In, button 2 as Zoom out, button 8 as Zoom to Fit, and button A as Zoom to Window. I also decided to set these buttons to a white color to differentiate them from the other buttons used so far. After choosing these buttons, I proceeded to add the commands. The command for Zoom In is SHIFT Z, for Zoom Out it is Z, for Zoom to Fit it is F, and Zoom to Window is W. Once these were all coded in and the code saved, I opened OnShape once again to test the functionality. All worked as expected. I hadn’t used the zoom to window command much before however adding it to the keypad I am finding myself using it more often all the time. Essentially zoom to window allows the user to draw a box around the section of the object they are working on, and it will zoom into that area.
Example of the Zoom in code:
if pressed[0]: #check to see if button 0 is pressed
if not held[0]: #check to make sure the held variable isn't true
print("Zoom in or shift z") #print action to serial monitor
kbd.send(Keycode.SHIFT,Keycode.Z) #send the keyboard command Shift Z to the device
held[0] = 1 #change the held variable for this button to trueThe next three commands I thought I would add would be to go directly to certain views. I decided to use buttons 3, 7, and 11 and include the commands to snap to the front view, top view, and isometric view. The commands for these three are SHIFT 1 for front view, SHIFT 5 for Top view, and SHIFT 7 for isometric view. I find myself using these buttons quite often to jump to these three views so I thought these would be good choices for this device. I also chose to have this colored blue, so I created a variable and applied that color to those pixels.
Example of the snap to front view code:
elif pressed[3]: #check to see if button 3 is pressed
if not held[3]:#check to make sure the held variable isn't true
print("Front View or Shift 1") #print action to serial monitor
kbd.send(Keycode.SHIFT, Keycode.ONE)#send the keyboard command Shift, One to the device
held[3] = 1 #change the held variable for this button to trueThe next two actions I decided to add were New Sketch and Extrude. I use these probably the most out of all the commands up to this point. For these two, I chose to use the buttons labeled C and D. As has been a theme with this project and CircuitPython, the code was very easy to add to the buttons. I chose to color these two buttons to be Violet. After setting up a variable for the color, I then proceeded to code in the keycodes for each, SHIFT S for a new sketch and SHIFT E for extrude. After saving and updating the code, I went back to OnShape to test. Just like before these were working flawlessly.
Code for new sketch and new extrude:
elif pressed[12]: #check to see if button 12 is pressed
if not held[12]:#check to make sure the held variable isn't true
print("New Sketch or Shift s") #print action to serial monitor
kbd.send(Keycode.SHIFT, Keycode.S)#send the keyboard command Shift, S to the device
held[12] = 1 #change the held variable for this button to true
elif pressed[13]: #check to see if button 13 is pressed
if not held[13]:#check to make sure the held variable isn't true
print("New Extrude or Shift e") #print action to serial monitor
kbd.send(Keycode.SHIFT, Keycode.E)#send the keyboard command Shift, E to the device
held[13] = 1 #change the held variable for this button to trueWhile testing out the new sketch command, I thought it would be nice to have the function to toggle between a regular line and a construction line in the sketch command. I decided to use the button labeled E for this. I set the color to orange and entered the keycode Q into the code.
Construction/ regular line toggle code:
elif pressed[14]: #check to see if button 14 is pressed
if not held[14]:#check to make sure the held variable isn't true
print("Toggle Construction line in Sketch or Q") #print action to serial monitor
kbd.send(Keycode.Q)#send the keyboard command Q to the device
held[14] = 1 #change the held variable for this button to trueFor the last button, it took me a while to decide what command to use. After looking through all of the shortcuts, I decided to add a clear selection button. I added the variable for the color red and then added the keycode command of SPACEBAR to the code for button F. I then saved the code and went back to Onshape for a final test. For the final test, I opened one of my previous designs and started by zooming way in and then way out. Next, I pushed the zoom to fit button and the object filled the screen. I then pressed the zoom to window button and used my mouse to zoom in to the top left corner of the object. I then proceeded to rotate the part to the left and right, followed by up and down. From there, I snapped to the front view, the top view, then the isometric view. After changing the views, I pressed the new sketch button and clicked on one of the faces of the object. I chose the line command and started drawing a line. As I was dragging the line across the object, I pressed the line type toggle button, and the line changed over to a construction line. Excellent!! I then pressed the red X to cancel out of the new sketch. Once that was canceled, I pressed the new extrude button and selected the face of the object again. Again, this worked flawlessly. Last, I selected two faces of the object, and after they were highlighted, I pressed the clear selection button.
After finishing this project, I was shocked by how easy it was to program and get up and running. Also, I was somewhat taken aback by how easy it was to make changes to the code and test those changes. If you have not tried CircuitPython, I highly recommend you check it out. There are tons of resources out there that make using it very easy.
Going forward, I’ve had the idea to adapt this so that it can also work for Fusion 360. In the little bit of looking into using this for fusion 360, I did notice some changes need that need to be made to the code to get this to work as it does in OnShape. For example, it looks like I will have to emulate a mouse to be able to make the part rotate. Fusion 360 uses a middle mouse button to enable rotation. This will require using the Adafruit HID library for the mouse, however, I think it should be easy to implement. Another option would be to try out Adafruit’s Macropad, which would enable a lot more commands by setting up a number of different pages of commands by using the encoder to select which page and then programming each page for a different area of the CAD software I’m using.
Hopefully, you have found this project writeup very useful and it has inspired you to create a similar project of your own.
I took a short video of the device operating in OnShape.
Here is the full code for this project:
import time
import board
import busio
import usb_hid
from adafruit_bus_device.i2c_device import I2CDevice
import adafruit_dotstar
from adafruit_hid.keyboard import Keyboard
from adafruit_hid.keyboard_layout_us import KeyboardLayoutUS
from adafruit_hid.keycode import Keycode
from adafruit_hid.consumer_control import ConsumerControl
from adafruit_hid.consumer_control_code import ConsumerControlCode
from digitalio import DigitalInOut, Direction, Pull
cs = DigitalInOut(board.GP17)
cs.direction = Direction.OUTPUT
cs.value = 0
num_pixels = 16
pixels = adafruit_dotstar.DotStar(board.GP18, board.GP19, num_pixels, brightness=0.1, auto_write=True)
i2c = busio.I2C(board.GP5, board.GP4)
device = I2CDevice(i2c, 0x20)
kbd = Keyboard(usb_hid.devices)
layout = KeyboardLayoutUS(kbd)
def read_button_states(x, y):
pressed = [0] * 16
with device:
device.write(bytes([0x0]))
result = bytearray(2)
device.readinto(result)
b = result[0] | result[1] << 8
for i in range(x, y):
if not (1 << i) & b:
pressed[i] = 1
else:
pressed[i] = 0
return pressed
held = [0] * 16
#The below colors are set up so that we don't have to repeat the RGB code multiple times
green = (0,255,0)
white = (100,100,100)
red = (255,0,0)
orange = (255,128,0)
light_red = (255,25,25)
violet = (89,0,179)
blue = (0,0,255)
pan = 0 # Pan 1 means that the Control and shift key will be on
pixels[5] = orange #turn pixel 5 on prior to starting the sketch
while True:
pressed = read_button_states(0, 16)
#Color coding the buttons according to thier function
pixels[0] = white
pixels[1] = green
pixels[2] = white
pixels[3] = blue
pixels[4] = green
pixels[6] = green
pixels[7] = blue
pixels[8] = white
pixels[9] = green
pixels[10] = white
pixels[11] = blue
pixels[12] = violet
pixels[13] = violet
pixels[14] = orange
pixels[15] = red
if pressed[0]: #check to see if button 0 is pressed
if not held[0]: #check to make sure the held variable isn't true
print("Zoom in or shift z") #print action to serial monitor
kbd.send(Keycode.SHIFT,Keycode.Z) #send the keyboard command Shift Z to the device
held[0] = 1 #change the held variable for this button to true
elif pressed[1]: #check to see if button 1 is pressed
# if not held[1]:#check to make sure the held variable isn't true
if pan != 1:
print("Up Arrow") #print action to serial monitor
kbd.send(Keycode.UP_ARROW)#send the keyboard command Up arrow to the device
time.sleep(0.1)
# held[1] = 1
else:
print("Up Arrow with Control and Shift") #print action to serial monitor
kbd.send(Keycode.CONTROL, Keycode.SHIFT, Keycode.UP_ARROW)#send the keyboard command Shift, Up arrow to the device
# time.sleep(0.1)
# held[1] = 1
elif pressed[2]: #check to see if button 2 is pressed
if not held[2]: #check to make sure the held variable isn't true
print("Zoom in or z") #print action to serial monitor
kbd.send(Keycode.Z) #send the keyboard command Z to the device
held[2] = 1 #change the held variable for this button to true
elif pressed[3]: #check to see if button 3 is pressed
if not held[3]:#check to make sure the held variable isn't true
print("Front View or Shift 1") #print action to serial monitor
kbd.send(Keycode.SHIFT, Keycode.ONE)#send the keyboard command Shift, One to the device
held[3] = 1 #change the held variable for this button to true
elif pressed[4]: #check to see if button 4 is pressed
# if not held[4]: #check to make sure the held variable isn't true
if pan != 1:
print("Left Arrow") #print action to serial monitor
kbd.send(Keycode.LEFT_ARROW)#send the keyboard command Left Arrrow to the device
time.sleep(0.1)
# held[4] = 1
else:
print("Left Arrow with Control and Shift") #print action to serial monitor
kbd.send(Keycode.CONTROL, Keycode.SHIFT, Keycode.LEFT_ARROW)#send the keyboard command Shift, Left Arrrow to the device
time.sleep(0.1)
# held[4] = 1
elif pressed[5]: #check to see if button 5 is pressed
if not held[5]:#check to make sure the held variable isn't true
if pan != 1: # check to see if the pan variable is not equal to 1
pixels[5] = light_red #set the pixel to light red
pan = 1 #set the pan variable to 1
print("Control Shift ON") #print action to serial monitor
held[5] = 1 #change the held variable for this button to true
elif pan == 1: # if the pan variable is equal to 1
pixels[5] = orange #set the pixel to orange
pan = 0 #set the pan variable to 0
print("Control Shift OFF") #print action to serial monitor
held[5] = 1 #change the held variable for this button to true
elif pressed[6]: #check to see if button 6 is pressed
# if not held[6]: #check to make sure the held variable isn't true
if pan != 1:
print("Right Arrow") #print action to serial monitor
kbd.send(Keycode.RIGHT_ARROW)#send the keyboard command Right Arrrow to the device
time.sleep(0.1)
# held[6] = 1
else:
print("Right Arrow with Control and Shift") #print action to serial monitor
kbd.send(Keycode.CONTROL, Keycode.SHIFT, Keycode.RIGHT_ARROW)#send the keyboard command Shift, Right Arrrow to the device
time.sleep(0.1)
# held[1] = 1
elif pressed[7]: #check to see if button 7 is pressed
if not held[7]:#check to make sure the held variable isn't true
print("Top View or Shift 5") #print action to serial monitor
kbd.send(Keycode.SHIFT, Keycode.FIVE)#send the keyboard command Shift, Five to the device
held[7] = 1 #change the held variable for this button to true
elif pressed[8]: #check to see if button 8 is pressed
if not held[8]:#check to make sure the held variable isn't true
print("Zoom to fit or f") #print action to serial monitor
kbd.send(Keycode.F)#send the keyboard command F to the device
held[8] = 1 #change the held variable for this button to true
elif pressed[9]: #check to see if button 9 is pressed
# if not held[9]:#check to make sure the held variable isn't true
if pan != 1:
print("Down Arrow") #print action to serial monitor
kbd.send(Keycode.DOWN_ARROW)#send the keyboard command Down Arrow to the device
time.sleep(0.1)
# held[9] = 1
else:
print("Down Arrow with Control and Shift") #print action to serial monitor
kbd.send(Keycode.CONTROL, Keycode.SHIFT, Keycode.DOWN_ARROW)#send the keyboard command Shift, Down Arrow to the device
time.sleep(0.1)
# held[1] = 1
elif pressed[10]: #check to see if button 10 is pressed
if not held[10]:#check to make sure the held variable isn't true
print("Zoom to window or w") #print action to serial monitor
kbd.send(Keycode.W)#send the keyboard command W to the device
held[10] = 1 #change the held variable for this button to true
elif pressed[11]: #check to see if button 11 is pressed
if not held[11]:#check to make sure the held variable isn't true
print("Isometric View or Shift 7") #print action to serial monitor
kbd.send(Keycode.SHIFT, Keycode.SEVEN)#send the keyboard command Shift, Seven to the device
held[11] = 1 #change the held variable for this button to true
elif pressed[12]: #check to see if button 12 is pressed
if not held[12]:#check to make sure the held variable isn't true
print("New Sketch or Shift s") #print action to serial monitor
kbd.send(Keycode.SHIFT, Keycode.S)#send the keyboard command Shift, S to the device
held[12] = 1 #change the held variable for this button to true
elif pressed[13]: #check to see if button 13 is pressed
if not held[13]:#check to make sure the held variable isn't true
print("New Extrude or Shift e") #print action to serial monitor
kbd.send(Keycode.SHIFT, Keycode.E)#send the keyboard command Shift, E to the device
held[13] = 1 #change the held variable for this button to true
elif pressed[14]: #check to see if button 14 is pressed
if not held[14]:#check to make sure the held variable isn't true
print("Toggle Construction line in Sketch or Q") #print action to serial monitor
kbd.send(Keycode.Q)#send the keyboard command Q to the device
held[14] = 1 #change the held variable for this button to true
elif pressed[15]: #check to see if button 15 is pressed
if not held[15]:#check to make sure the held variable isn't true
print("Clear Selection or SPACEBAR") #print action to serial monitor
kbd.send(Keycode.SPACEBAR)#send the keyboard command Spacebar to the device
held[15] = 1 #change the held variable for this button to true
else: # Released state
for i in range(16):
held[i] = 0 # Set held states to off
time.sleep(0.1) # Debounce